
-
Pl
chevron_right
Erlang Solutions: MongooseIM 6.5: Open for Integration
news.movim.eu / PlanetJabber • 20 January 2026 • 6 minutes
MongooseIM 6.5: Open for Integration is now available. This release focuses on easier integration with your applications while continuing to deliver a scalable and reliable XMPP-based messaging server.
For such integration, you can use the Admin or User GraphQL API. Another example is the interaction of MongooseIM with a database. A relational DB such as PostgreSQL, MySQL or CockroachDB can be used to store user accounts, message archives, multi-user chatrooms, publish-subscribe nodes, cluster nodes and much more. Other supported databases and storage services include Cassandra or Elastic Search for message archive, Redis for user sessions and LDAP for authentication.
You can see the
complete list
in our documentation.
There is another important way to let MongooseIM interact with your distributed system:
event pushing
. The core of this functionality is the
event pusher
module, which can push selected events to services like
Amazon SNS
,
RabbitMQ
or
MongoosePush
. In the most recent release 6.5.0, we have improved the event pushing mechanism, focusing on better integration with RabbitMQ.
Event pushing in MongooseIM 6.5.0
The diagram below explains the event pushing architecture in the latest version of MongooseIM:
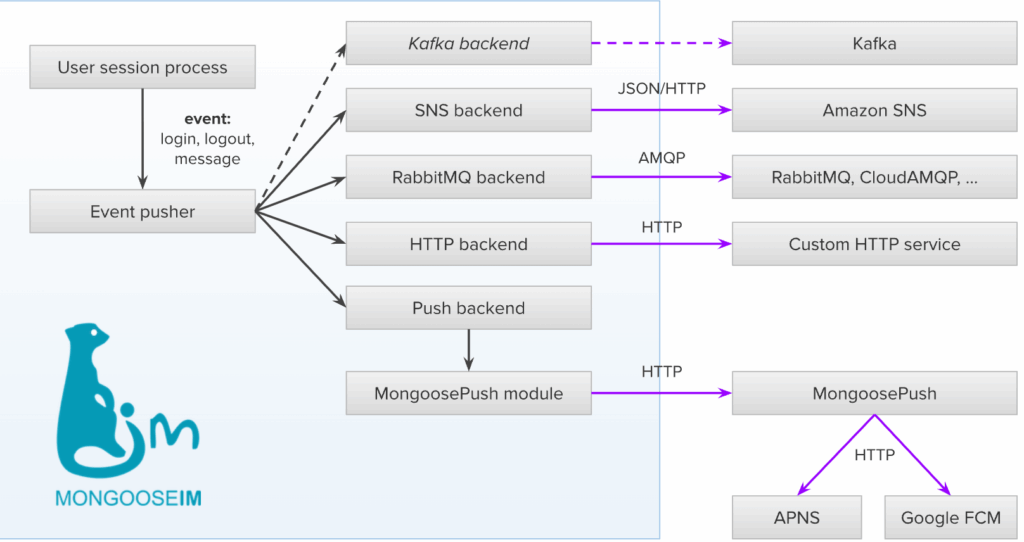
Events utilize the concept of
hooks and handlers
. Currently, events are triggered for a few selected hooks, e.g. when a user logs in/out or sends/receives a message. There are almost 140 different hooks defined in MongooseIM though, so there is much room for adding custom events. A module called
mod_event_pusher_hook_translator
handles the selected hooks, creating events and passing them to the main event pusher API function,
mod_event_pusher:push_event/2
.
Then, a hook called
push_event
is triggered, leveraging the hooks-and-handlers mechanism for the second time. This hook is handled by configurable service-specific backend modules, such as:
- sns – for sending notifications to Amazon SNS,
- rabbit – for sending notifications to RabbitMQ or CloudAMQP,
- http – for sending notifications to a custom service,
- push – for sending push notifications to mobile devices with the help of MongoosePush.
These modules act as interfaces to the corresponding external services. A key feature of this design is its extensibility. For example, one can easily add a
kafka
backend module that would deliver the events to Apache Kafka as shown on the diagram above.
Push notifications
Let’s focus on the
push
module as it is a bit more complex. In general, it uses hooks and handlers once again – the
push_notifications
hook in particular. In order to actually deliver push notifications to a mobile device, a module called
mod_push_service_mongoosepush
handles that hook by sending the notifications to a separate service called
MongoosePush
. Finally, MongoosePush will dispatch the notification request and send the notifications to configured services such as
APNs
or
Google FCM
.
Each stage of this process is configurable and extensible. Firstly, we have assumed that a
virtual pubsub host
is used, but there is also an option to use a separate pubsub node for push notifications as described in
XEP-0357: Push Notifications
, adding another step before running the
push_notifications
hook. Speaking about that hook, you can implement your own module handling it by calling your own service instead of MongoosePush. Additionally, if you need to extend the notification logic with additional filtering and processing, you can implement a
plugin
module to
mod_event_pusher_push
.
Pushing events to RabbitMQ
As the RabbitMQ backend module was improved and made production-ready in version 6.5.0, let’s use it as an example of how you can easily configure MongooseIM to push events to RabbitMQ. The simplest way to demonstrate this is with Docker containers. Firstly, we need a container for RabbitMQ:
docker network create example
docker run --rm -d --network example --name rabbit rabbitmq:management
The
management
tag is used because we will need the
rabbitmqadmin
command. The default port
5672
will be used by MongooseIM. The connection is unencrypted for simplicity, but it is recommended to use TLS in a production environment.
As the next step, let’s obtain the default
mongooseim.toml
configuration file from the
MongooseIM 6.5.0
image:
docker create --name mongooseim erlangsolutions/mongooseim:6.5.0
docker cp mongooseim:/usr/lib/mongooseim/etc/mongooseim.toml .
docker rm mongooseim
This default configuration file uses the Mnesia internal database. Although we recommend using
CETS
and a relational database instead of Mnesia, in this example we will try to keep it as simple as possible – so you only need to add the following to
mongooseim.toml
:
[outgoing_pools.rabbit.event_pusher]
  connection.host = "rabbit"

[modules.mod_event_pusher.rabbit]
  chat_msg_exchange = {}
The first section configures a pool of connections to RabbitMQ with the default
settings
, while the second one enables the event pusher module with the
rabbit
backend, and includes
chat_msg_exchange
in order to enable the exchange for one-to-one chat messages (called
chat_msg
by default – see all
options
). If you are wondering where to add these lines to
mongooseim.toml
– you can put them anywhere, but it is recommended to group them by section (e.g.
outgoing_pools, modules
etc.) for readability.
Having the configuration file ready, we can start the MongooseIM container:
docker run --rm -d --network example -e JOIN_CLUSTER=false \
  -v ./mongooseim.toml:/usr/lib/mongooseim/etc/mongooseim.toml \
  --name mongooseim erlangsolutions/mongooseim:6.5.0
After it starts, the
chat_msg
exchange should be automatically created in RabbitMQ. In order to see its messages, we need to bind a queue to it.
docker exec -it rabbit rabbitmqadmin declare queue --name recv
docker exec -it rabbit rabbitmqadmin declare binding --source chat_msg --destination recv --destination-type queue --routing-key "*.chat_msg_recv"
The routing key
*.chat_msg_recv
means that only the events for received messages will be routed – in this example we skip all events for sent messages. Now let’s create two user accounts in MongooseIM:
docker exec -it mongooseim mongooseimctl account registerUser --username alice --domain localhost --password secret
docker exec -it mongooseim mongooseimctl account registerUser --username bob --domain localhost --password secret
You should get the “User … successfully registered” message for each of them. Next, send the message from
alice
to
bob
– we could do that with an
XMPP client
, but the simplest way here is to use the admin CLI:
docker exec -it mongooseim mongooseimctl stanza sendMessage --from alice@localhost --to bob@localhost --body hello
Now we can check if the message event was sent to our RabbitMQ queue:
docker exec -it rabbit rabbitmqadmin get messages --queue recv
The payload should be:
{"to_user_id": "bob@localhost", "from_user_id": "alice@localhost", "message": "hello"}
This simple example shows how easy it is to extend the functionality of MongooseIM beyond XMPP – as soon as you have the events in a message queue like RabbitMQ, you can perform various actions on them such as calculating statistics for billing purposes, performing analytics or storing them in an external database separate from MongooseIM.
Summary
The most important improvement in MongooseIM 6.5.0 is the production-ready integration with RabbitMQ, allowing external services to process the events from the server. It is worth noting that the mechanism is highly extensible – you can craft such extensions yourself, but of course don’t hesitate to contact us if you are considering using it in your business – we will be happy to help you install, configure, maintain, and – if necessary – customise it to fit your particular needs. For more information about the latest improvements, see the release notes .
The post MongooseIM 6.5: Open for Integration appeared first on Erlang Solutions .